Oh boy, I am getting SO sick of my internet!!!! I had some great things to post about this past week (finally!) and I actually got one post mostly finished, before.....wait for it.....my MODEM died!!!
Remember.....this is my NEW modem that I got awhile ago because my last modem died! At least it is under warranty, so they sent me a new one - for free!! :-D -- and I just got it today and got it set up!!
Sooooo......I'M BACK!!!! :-D
I'm sure people were starting to worry -- heck, even my (ONE!) sister who reads my blog actually called to make sure I was ok!! LOL Thanks Amy! ;-)
So now, I have to clean up my emails (I have about 700 unread emails to go through! - I am on way too many lists!!) - email back any friends that are waiting for me, then check out my favorite forum - A Primitive Place, and my favorite blogs, and finish up that post that is almost finished, then....I think it will be time for breakfast tomorrow!!! Hahaha! :-D
I AM very happy to have my internet back again.....I'm wondering how many other things I can have go wrong with my internet??? At least it wasn't a bad COMPUTER!!! I wouldn't be able to replace THAT as quickly! :-)
I really missed my internet this week, and not just because I like to email and blog (at least I don't do facebook and tweets/whatever they are!) -- but I use my internet now for all kinds of things: recipes, news stories, advice about cleaning products, ideas about patterns I am looking for; not to mention PINTEREST!! I found it very hard to be without my Instant Encyclopedia and favorite picture catalog for four days!!!
Anyway, I'm here again, finally, and I'LL BE BACK.....with a real post, the one I started last Sunday night! It's a good one!! ^-^
Thursday, February 28, 2013
Saturday, February 16, 2013
WHAT THE......
......HECK is going on here.....????


Can you believe this??? I kid-you-not.....it was 60 degrees outside yesterday -- I didn't even wear my sweater at one point, because the sun felt so nice!!! LOL
It started innocently enough.....
 I saw these little white flakes and laughingly told Brian, "hey, it's snowing! Hahaha!!", as I took a quick picture so I could post it on my blog, making a joke about snow in the south, blah blah, some smug little blurb -- because I've been planning on starting seedlings this week, because it's been SO beautiful out!! Well, this shows you what I know......
 Ok, you can STOP now....!!!! LOL
Isn't it so pretty, though?! :-D Once I realized we were really getting snow, I ran around the house, clicking on all the window candles that I've stubbornly kept in the windows waiting for just such an occasion!! And then we lit a fire in the fireplace! Let the snow-fun begin!!!! :-D
At the heaviest snowfall point, we heard something I've NEVER heard before, in my life -- THUNDER!!!! Can you believe that??? I didn't know that ever happened, but apparently it's something called "thundersnow", and can occasionally occur in unstable snow/storm clouds.....which are mostly in the South! LOL So that was pretty neat!! :-D
The snow fell hard and fast -- we got about 3.5 inches in just under 2 hours!
The kids - and DOGS - loved it!!! They spent the whole time outside eating it - both kids and dogs! - just like they used to do when they were VERY little and we still lived in Massachusetts!! Now that they are older, and snow is so much rarer here, they put out my cooking pots to catch as much snow as they can to eat!! LOL
Of course, we had to make SNOW CREAM, that southern staple during snowfalls!! :-D
Start with a large bowl of clean snow.....
 .....get your other ingredients together.....
 ......sugar, cream, vanilla -- SOOO simple!!
Sprinkle the sugar on the snow, and stir it in......

For a bowl this size I use between 1/2 to 3/4 cup of sugar. Look at how smooth all the clumped snow gets when the sugar is mixed in!
Get the cream and vanilla ready.....
 I started with 1 cup of cream and 2 teaspoons of vanilla -- you don't have to use CREAM, you can use milk of any kind if you want it "lighter"....the vanilla should stay the same, if you like it!
Pour it in and stir that around......
 You can see that 1 cup wasn't quite enough! Just pour a little more in at a time....I ended up using almost the whole pint to get the consistency that we like!
Voila!!!
 Spoon it into cups and eat it!! :-D It tastes like very cold vanilla ice cream! Quick and yummy!!!
I don't know what's going to happen tomorrow, now.....the snow stopped hours ago, around 5:30pm, but the news was scrolling a whole bunch of church closings and after-church-event closings -- will the food stores be open if we go there? It's going to be around 20 degrees tonight and only around 30 by noon tomorrow.....not warm enough to melt slick roads, and they don't sand them very well, especially the secondary roads, that WE travel!! And I need to do my food shopping tomorrow -- this storm has caught me completely unawares! LOL
Oh, but it is so pretty to be surrounded by snow-covered trees......


 They are so pretty!! We didn't get ANY snow last year, so this does make me happy! It makes me especially happy because it's supposed to be 55 degrees again by Monday!! Hahaha! So we can enjoy it while it lasts! :-D
I wish I had any kind of project to report......I just DON'T. I haven't done ANYTHING lately, anything with the house or in the house, at least. I still haven't been home enough this week to get anything planned, nevermind started, so my project-hiatus continues. :-(
I love looking over my favorite blogs and Pinterest and picture trails at night, though!! I am finding some neat plans, but they will have to wait for now. And I want to thank Barbara for all her emails, with all her ideas and patterns that she loves!!! They have been some of the fun things I look at online, that lift my spirits! I am definitely wanting to make that horse you emailed -- you were right, Barb, it's exactly what I was looking for!! :-D Now to get the materials together and get started.....! ^-^


It started innocently enough.....


Isn't it so pretty, though?! :-D Once I realized we were really getting snow, I ran around the house, clicking on all the window candles that I've stubbornly kept in the windows waiting for just such an occasion!! And then we lit a fire in the fireplace! Let the snow-fun begin!!!! :-D
At the heaviest snowfall point, we heard something I've NEVER heard before, in my life -- THUNDER!!!! Can you believe that??? I didn't know that ever happened, but apparently it's something called "thundersnow", and can occasionally occur in unstable snow/storm clouds.....which are mostly in the South! LOL So that was pretty neat!! :-D
The snow fell hard and fast -- we got about 3.5 inches in just under 2 hours!
The kids - and DOGS - loved it!!! They spent the whole time outside eating it - both kids and dogs! - just like they used to do when they were VERY little and we still lived in Massachusetts!! Now that they are older, and snow is so much rarer here, they put out my cooking pots to catch as much snow as they can to eat!! LOL
Of course, we had to make SNOW CREAM, that southern staple during snowfalls!! :-D
Start with a large bowl of clean snow.....


Sprinkle the sugar on the snow, and stir it in......

For a bowl this size I use between 1/2 to 3/4 cup of sugar. Look at how smooth all the clumped snow gets when the sugar is mixed in!
Get the cream and vanilla ready.....


Voila!!!

I don't know what's going to happen tomorrow, now.....the snow stopped hours ago, around 5:30pm, but the news was scrolling a whole bunch of church closings and after-church-event closings -- will the food stores be open if we go there? It's going to be around 20 degrees tonight and only around 30 by noon tomorrow.....not warm enough to melt slick roads, and they don't sand them very well, especially the secondary roads, that WE travel!! And I need to do my food shopping tomorrow -- this storm has caught me completely unawares! LOL
Oh, but it is so pretty to be surrounded by snow-covered trees......


I wish I had any kind of project to report......I just DON'T. I haven't done ANYTHING lately, anything with the house or in the house, at least. I still haven't been home enough this week to get anything planned, nevermind started, so my project-hiatus continues. :-(
I love looking over my favorite blogs and Pinterest and picture trails at night, though!! I am finding some neat plans, but they will have to wait for now. And I want to thank Barbara for all her emails, with all her ideas and patterns that she loves!!! They have been some of the fun things I look at online, that lift my spirits! I am definitely wanting to make that horse you emailed -- you were right, Barb, it's exactly what I was looking for!! :-D Now to get the materials together and get started.....! ^-^
Wednesday, February 6, 2013
Some FUN Things!!!
I have a few fun things I want to show everyone!!! :-D
Last weekend, we stopped at Habitat For Humanity so Brian could look for something (I didn't really pay attention to what it was! LOL), and look what I found.....
 An ugly jewelry box! YAY!! It has red velvet drawers and a wind-up music box in back that doesn't work.....but all I could see was a little chest with three long drawers....Oooooh!!! :-D
It was $3.50, so I grabbed it!
Here at home, I pried off the ugly little drawer pulls, and filled the teensy holes with putty.....
 I thought about a single wooden knob in the center of each drawer, but I wanted something different, so I thought about these.....
 PERFECT!!! Except they were a little too tall, so I had Brian shave off a little of the bottoms.....
 Just right!! :-)
I was planning on painting it, maybe a dark brown or green. But when I sanded the front of the drawers to smooth the wood putty, I liked the look! The finish sanded off very easily, and I made sure to get ALL of the ugly gold lines off......

 Yeah, I wanted to keep it like this!! I did want to stain over it a little, and I knew exactly which stain I was going to use.....
 That is "Jacobean" -- I can only get it at a tiny little hardware store that is only open three days a week!! I found it by accident while I was there with Brian -- what luck!! :-D
I was looking everywhere for it, because it's one part of an aging process for wood that I saw on Pinterest -- I can't wait to try that!
But anyway, back to my little chest!
I rubbed the stain over the whole chest and drawers, and then the knobs.....

 NICE!!!
After everything dried, I glued the knobs on and put the drawers back in, and it was DONE....
 I LOVE IT!!! :-D
Here's a better angle.....
 PERFECT!!! I am loving my growing collection of little "spice chests", or drawer chests! And I can always paint it, if I get tired of it like this.....but I like having a mixture of painted and stained pieces, so I think I'll always love it like this! :-)
I also found some fabric there (at Habitat) too.....

 It's TWO yards, and you can see it was $1!!!! WOW! I think it's a kind of linen, see the up-close picture of the weave? I think it would be great for embroidery, or rug hooking, or even backing my penny rugs, or even curtains!! I was thrilled to see this there! TWO treasures in one place!! :-D
I also want to show you my new cookie cutters - I got them on ebay, and paid $8 TOTAL (includes shipping) for them......
 Aren't they GREAT!?!! I LOVE the two trees -- I'll be using them next year for gingerbread ornaments! And a primitive Santa is in the bottom-center -- see it's a side-view of him, with his pack over his shoulder!! LOVE him! And then I have two bunnies, a primitive shaped one, just above the Santa, and then the other one, along with a lion and horse. I LOVE bunnies, especially prim-shaped! I've never liked crows in my primitive decorating.....maybe it's from seeing them eating dead, squashed animals in the road, or watching them peck Cardinals off of my bird feeders (that's when I send Puppy outside to scare them off!).....crows aren't very nice creatures! Bunnies are cute and sweet, and so quiet....and they have a great silhouette for adding them to rugs or stencils, etc.
So I am SO excited that I got TWO bunny cutters!! :-D
This weekend is going to be fun, I think -- I am going to have a little extra money, and I am planning on buying some wood! For what, I'm not sure yet.....maybe for the floor, or maybe for a dry sink that I want to build for my kitchen!!! (don't tell Brian! Hee hee hee!!!)
Either one will make me VERY happy! :-D It has been a difficult January for me here, some extra worries (my neighbor), and NO extra money after any paydays. But I've been positive about it all, I know that money problems come and go, so it won't last forever; and I've enjoyed helping my neighbor and spending more time with her. We are thinking about what herbs we want for an herb garden behind my house this year! We want some healing herbs, and some decorative herbs!! :-D
Now as our financial constraints loosen a little, I am itching to get my wood floor started! I've thought and planned about it so much that I know exactly every step I will take with it!! So it should be VERY smooth going! And just WAIT until you see how great it looks!!! :-D
So check back this weekend.....if you see a post with a giant smily-face in the title, you'll know that I got my wood!!!! ^-^
Last weekend, we stopped at Habitat For Humanity so Brian could look for something (I didn't really pay attention to what it was! LOL), and look what I found.....

It was $3.50, so I grabbed it!
Here at home, I pried off the ugly little drawer pulls, and filled the teensy holes with putty.....


I was planning on painting it, maybe a dark brown or green. But when I sanded the front of the drawers to smooth the wood putty, I liked the look! The finish sanded off very easily, and I made sure to get ALL of the ugly gold lines off......


I was looking everywhere for it, because it's one part of an aging process for wood that I saw on Pinterest -- I can't wait to try that!
But anyway, back to my little chest!
I rubbed the stain over the whole chest and drawers, and then the knobs.....


After everything dried, I glued the knobs on and put the drawers back in, and it was DONE....

Here's a better angle.....

I also found some fabric there (at Habitat) too.....


I also want to show you my new cookie cutters - I got them on ebay, and paid $8 TOTAL (includes shipping) for them......

So I am SO excited that I got TWO bunny cutters!! :-D
This weekend is going to be fun, I think -- I am going to have a little extra money, and I am planning on buying some wood! For what, I'm not sure yet.....maybe for the floor, or maybe for a dry sink that I want to build for my kitchen!!! (don't tell Brian! Hee hee hee!!!)
Either one will make me VERY happy! :-D It has been a difficult January for me here, some extra worries (my neighbor), and NO extra money after any paydays. But I've been positive about it all, I know that money problems come and go, so it won't last forever; and I've enjoyed helping my neighbor and spending more time with her. We are thinking about what herbs we want for an herb garden behind my house this year! We want some healing herbs, and some decorative herbs!! :-D
Now as our financial constraints loosen a little, I am itching to get my wood floor started! I've thought and planned about it so much that I know exactly every step I will take with it!! So it should be VERY smooth going! And just WAIT until you see how great it looks!!! :-D
So check back this weekend.....if you see a post with a giant smily-face in the title, you'll know that I got my wood!!!! ^-^
Sunday, February 3, 2013
Look At What I Made....!!
I have had a very creatively quiet few weeks here. Obviously, because I normally post every few days with some new fun thing I'm working on, but not this month -- I usually have about 15-20 posts a month.....I think I have 9 for January. Hmmm.....that is going to have to change!!
Part of it is that I'm spending alot of time with my neighbor as she goes through her healing. She will be starting chemo soon, and actually it should be easier on her because it is once a month for 6 months. I think that's GOOD news! She's also looking seriously at changing her eating, and adding herbs and vitamins, and raw fruits and vegetables. So I am helping her with making new foods, and shopping and looking things up on the internet, just small helpful things. I haven't been thinking of my house or my projects, or anything like that.
But this weekend, I got a little bee in my bonnet (haha!) about something I've been wanting to try for quite awhile -- homemade beeswax polish!! :-D Tinted dark brown, of course!
The reason is that everyone talks about Briwax being able to give a most amazing aged finish to their wood furniture, so I've been searching everywhere for it! I finally found it at Ace Hardware, but it's $19!!!! And the cheapest online has been $20!! That's OUT of my price range for something like that, so I've been intent on making it myself! :-D
I already have blocks of beeswax (for another project that I will talk about whenever I decide to do it!), and according to formulas online, all I need is turpentine to go in it......so I finally found some this weekend, on a dusty shelf at Lowe's, and today, me and Brian made the polish!!! :-D
First, I gathered my supplies.....
 That's my beeswax block, and I have two wax dyes, one is brown and the other is black. I wasn't sure which one I would need, so I had them both ready.
Next, Brian cut about 1/4 of the block off, and grated it for me (he's so much stronger than I am, it goes alot quicker! :-) ).......

Then, I put the shavings into one of my (many) saved tin cans, and put the can into hot water on the stove.....
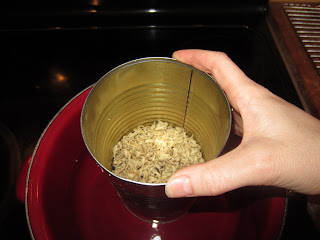 (this is also where I pointed out to Brian that it's a pretty good thing that I save cans!)
It melted in just a few minutes!!
I dropped in the brown dye.....
 .....and stirred it in. It looks pretty dark in the can, but we put a few drops on a white paper plate, and it wasn't nearly as dark, so I added a little more of the brown dye, but it was still too light for what I wanted......
 .....and actually, this picture shows the drops as much darker than they are in real life! You can see how the lower drops got darker after I added more brown dye.
It was time to take out the big guns.....
 I only needed a little corner of one of these diamonds, because the package says that one will color a whole pound of wax!
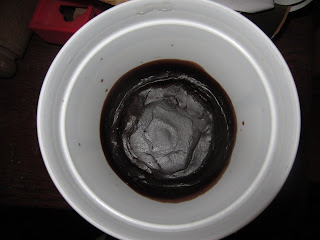
In it went, a few stirs of the stick and look at what I got.....
 That was dark enough for me!! :-D
Keep in mind, of course, that I have NO IDEA how any of these tints might look actually rubbed ON something! You can't know, because it has to be dyed before the turpentine is added, thereby making it a polish!! SO.....forward I went with what I THINK is a great, dark color!!!
To add the turpentine, we took it outside because of the poisonous fumes. I also didn't take any pictures OF the turpentine, because I was giving it my full attention while I was adding it!
First, I poured the melted wax into the container I am storing it in.....
 .....I'm saving the melting can for my next wax project! :-D.....

I added about 4oz. of turpentine, which I measured in another saved can I had, a smaller one! And then we just left it to cool. I wanted to stir it and mix it around as it cooled, because I thought it might harden in places, but the wax would clump together on my stirring stick when I did, so I finally gave up and just left it alone!
Here it is, about 1 1/2 hours later, completely cooled.....
Now look what happens when I squeeze the sides of the container.....
 VOILA!!! It's a softened wax polish!!! :-D
You would think I had used it already, just to see how it looked, but I actually haven't yet! LOL
I just forgot about it, after getting dinner started and cleaned up, and then getting Brian's work things together for tomorrow (sniff! sniff!).....and when I did remember, I didn't want to try it at night when I can't see it's real effect!
So I'm going to try it out first thing tomorrow morning, and I'll be sure to report back!! :-D
It looks like it's going to be perfect, so I hope I'm happy with it! It does smell AWFUL, though.....I wonder if real Briwax smells bad too....?
It was actually really fun to make it, and now to have it! And working with the wax was so easy -- I feel confident to try other wax projects now! :-D
Oh, but first I have a few other fun things I want to do this week!! Tomorrow morning, I'm going over to my neighbor's house for an hour or so, but when I get home I want to tackle another fun project.....it shouldn't take me long, so I have no reason NOT to!
You'll have to come back to see what it is.....!! (and to see how the polish works!) ^-^
Part of it is that I'm spending alot of time with my neighbor as she goes through her healing. She will be starting chemo soon, and actually it should be easier on her because it is once a month for 6 months. I think that's GOOD news! She's also looking seriously at changing her eating, and adding herbs and vitamins, and raw fruits and vegetables. So I am helping her with making new foods, and shopping and looking things up on the internet, just small helpful things. I haven't been thinking of my house or my projects, or anything like that.
But this weekend, I got a little bee in my bonnet (haha!) about something I've been wanting to try for quite awhile -- homemade beeswax polish!! :-D Tinted dark brown, of course!
The reason is that everyone talks about Briwax being able to give a most amazing aged finish to their wood furniture, so I've been searching everywhere for it! I finally found it at Ace Hardware, but it's $19!!!! And the cheapest online has been $20!! That's OUT of my price range for something like that, so I've been intent on making it myself! :-D
I already have blocks of beeswax (for another project that I will talk about whenever I decide to do it!), and according to formulas online, all I need is turpentine to go in it......so I finally found some this weekend, on a dusty shelf at Lowe's, and today, me and Brian made the polish!!! :-D
First, I gathered my supplies.....

Next, Brian cut about 1/4 of the block off, and grated it for me (he's so much stronger than I am, it goes alot quicker! :-) ).......

Then, I put the shavings into one of my (many) saved tin cans, and put the can into hot water on the stove.....

It melted in just a few minutes!!
I dropped in the brown dye.....


It was time to take out the big guns.....

In it went, a few stirs of the stick and look at what I got.....

Keep in mind, of course, that I have NO IDEA how any of these tints might look actually rubbed ON something! You can't know, because it has to be dyed before the turpentine is added, thereby making it a polish!! SO.....forward I went with what I THINK is a great, dark color!!!
To add the turpentine, we took it outside because of the poisonous fumes. I also didn't take any pictures OF the turpentine, because I was giving it my full attention while I was adding it!
First, I poured the melted wax into the container I am storing it in.....


I added about 4oz. of turpentine, which I measured in another saved can I had, a smaller one! And then we just left it to cool. I wanted to stir it and mix it around as it cooled, because I thought it might harden in places, but the wax would clump together on my stirring stick when I did, so I finally gave up and just left it alone!
Here it is, about 1 1/2 hours later, completely cooled.....

Now look what happens when I squeeze the sides of the container.....

You would think I had used it already, just to see how it looked, but I actually haven't yet! LOL
I just forgot about it, after getting dinner started and cleaned up, and then getting Brian's work things together for tomorrow (sniff! sniff!).....and when I did remember, I didn't want to try it at night when I can't see it's real effect!
So I'm going to try it out first thing tomorrow morning, and I'll be sure to report back!! :-D
It looks like it's going to be perfect, so I hope I'm happy with it! It does smell AWFUL, though.....I wonder if real Briwax smells bad too....?
It was actually really fun to make it, and now to have it! And working with the wax was so easy -- I feel confident to try other wax projects now! :-D
Oh, but first I have a few other fun things I want to do this week!! Tomorrow morning, I'm going over to my neighbor's house for an hour or so, but when I get home I want to tackle another fun project.....it shouldn't take me long, so I have no reason NOT to!
You'll have to come back to see what it is.....!! (and to see how the polish works!) ^-^
Subscribe to:
Posts (Atom)